As the "Christmas Craziness" is winding down I find that I am able to take a deep breath and take a step back. I finished all of the projects that were then given away as gifts and right now I have no deadlines to worry about. This is the perfect time for re-organizing my crafting space and cleaning up all of the schnibbles of fabric and paper that have become a carpet. Perhaps it is also a good time to re-organize my blog?
At the beginning of the year I really tried to post something at least once a week, and for most of the beginning of the year I did just that. Of course things got crazy as we moved to a new town in the summer and then the holiday season snuck up on me and I got distracted with life... but overall I'd say it was a productive year. I was able to share over 19 projects with you guys!
Looking towards 2013 I still have lots of projects that I can't wait to get started on and some new things that I want to try. It is still a goal of mine to post stuff weekly and regularly, but in addition to my posts of finished projects, I am thinking of doing "work-in-progress" posts along the way. I started this blog as a means to motivate myself to finish craft projects and I am often working on multiple projects at the same time and some of my projects take longer than others. So I suppose that I am looking for some feedback from you, my faithful followers... would you be interested in seeing weekly "work-in-progress" posts of the things that I'm working on? Which 2012 post did you enjoy the most? Is there anything that you would like to see more or less of?
Thanks for sharing 2012 with me! Here's to a great 2013!
--Doodle

The stuff I make in my spare time.
Monday, December 31, 2012

Friday, December 21, 2012
Striped Pillowcase
Where's Waldo?
The question went through my mind as I worked on this pillowcase for my sister...


The question went through my mind as I worked on this pillowcase for my sister...

She's studying at RPI and joined the rugby team there... so I made her a rugby-inspired pillowcase in her school colors. Apparently there are a lot of wide stripes in traditional rugby apparel... and RPI's colors are red and white.

And now that the Christmas season is upon us, I am also reminded of candy canes...

Wednesday, November 14, 2012
Wedding Rings
Two of our good friends got married a couple weeks ago and I made them some special pillowcases as a gift. I found a traditional quilt design called "double wedding rings" and knew that it would be perfect for the occasion! At first the pattern seemed quite daunting... for one thing it has curves. Curves are tricky to sew. Pieced curves that have to match up at the ends are even trickier. ...and I'd never really done a curvy quilt before. But I decided that I should challenge myself and try it! I found free printable templates at french-knots.com and got to work.


I knew they liked "autumnal" colors so I decided to go with warm golden browns and a little bit of red and green. The not-so-fun part was cutting out dozens of little trapezoids from the various fabrics... and by dozens I actually mean 196... Those little trapezoids were then sewn into arcs.

At this point I arranged the arcs into the double-ring design and tried to make sure that there was a nice visual balance. Then it was time to sew the arcs into football-shapes.

This required matching up the bottom corners of the arcs so that the red squarish pieces lined up properly... and sewing these curves meant bending the arcs around backwards and pinning them like crazy!

See what I mean? Once all of the football-shapes were finished I could then sew them together onto the center pieces.

Here is where the template instructions stopped... Now If I was making a huge quilt I would just keep connecting rings until it was the size I wanted, but here I wanted to use the rings as a visual element on a pillowcase. So I kind of made the rest up... to keep things relatively simple I just appliqued the rings onto the background fabric.

Then once that was done I had this crazy idea that I should do some fancy leafy shaped quilting around the rings. Again, this was something that I had never done before... and perhaps I should actually take a quilting class someday... There is probably a much better way to do this... but oh well.
In order to make my leafy design uniform and consistent I drew up some designs and printed them on freezer paper (much like I did on my stenciled pillowcase) and ironed them in place. Then I sandwiched my batting between the top and the back and sewed over the lines on the sewing machine. I wouldn't recommend this method for several reasons, but mainly because I ended up having to fold the pillowcase up and maneuver it around my machine and the freezer paper started peeling off as it was folded and bent. Pinning the paper kept it in place, but it still shifted somewhat.

But finally, FINALLY! After all of that, it was a simply matter of sewing some panels onto the back to create a pair of lovely pillow shams! (I constructed the backs much like I did for my "No-Slip Pillowcase.")

I have to say that I am pretty proud of my first "curvy" pieced design with it's "fancy leafy shaped quilting!" I learned a lot and even though they aren't perfect, I still think they look cool!


Wednesday, October 17, 2012
Piquing Your Interest in Pinterest!
There is a new social networking site that has been taking the internet by storm: Pinterest.
What is Pinterest, you ask?
Think of it as a giant, digital bulletin board that you can tack pictures onto. Or think of it as a giant, digital folder that you can stuff new recipes into. Or even think of it as a giant, digital dish of creativity ice cream topped with do-it-yourself sprinkles and a cherry of inspiration on top!
Basically, Pinterest allows you to share website links via pictures or "pins." Right now you can only join Pinterest if you are invited by a current Pinterest user (feel free to ask me for an invite...) but once you become a Pinterest user you can organize these interesting websites or "pins" into different groups or "boards" and you can share your "pins" with other users.
So before I found Pinterest I would search the web for interesting craft projects that I wanted to try and I would bookmark blogs and websites with cool stuff on them. However, a bookmark in a typical browser is usually just the name of the webpage. This is fine if the bookmark is for "Facebook" or "e-mail," but after a week I would completely forget what "a glimpse inside: fall garland" was... and I realized that I had lists and lists of meaningless words...
But then I found Pinterest and my vague bookmark link became this:

They say a picture is worth a thousand words... and this is especially true of Pinterest. For us visual learners and creative types it is wonderfully helpful when organizing favorite craft tutorials and recipes. Of course, there are other people who use Pinterest to catalog their wishlists of the latest fashions or to collect funny cartoons and memes. Because you can search for and see other pins that people have pinned it's easy to gather inspiration for themed parties or holiday decorations too.
Anyways... I recently found a group of crafty people at our local library who meet twice a month to try out crafts and recipes that they have found on Pinterest! I was so excited! It's been an awesome way to get out of the house every so often and it's a great way to try new things. Last week we tried (you guessed it) the fall garlands pictured above as well as some cinnamon bun popcorn.
The fall garland is simply a number of little pumpkins and apples that have been stung together on jute twine. The pumpkins and apples are made out of toilet paper tubes of all things! I was quite happy with how mine turned out:


What is Pinterest, you ask?
Think of it as a giant, digital bulletin board that you can tack pictures onto. Or think of it as a giant, digital folder that you can stuff new recipes into. Or even think of it as a giant, digital dish of creativity ice cream topped with do-it-yourself sprinkles and a cherry of inspiration on top!
Basically, Pinterest allows you to share website links via pictures or "pins." Right now you can only join Pinterest if you are invited by a current Pinterest user (feel free to ask me for an invite...) but once you become a Pinterest user you can organize these interesting websites or "pins" into different groups or "boards" and you can share your "pins" with other users.
So before I found Pinterest I would search the web for interesting craft projects that I wanted to try and I would bookmark blogs and websites with cool stuff on them. However, a bookmark in a typical browser is usually just the name of the webpage. This is fine if the bookmark is for "Facebook" or "e-mail," but after a week I would completely forget what "a glimpse inside: fall garland" was... and I realized that I had lists and lists of meaningless words...
But then I found Pinterest and my vague bookmark link became this:

They say a picture is worth a thousand words... and this is especially true of Pinterest. For us visual learners and creative types it is wonderfully helpful when organizing favorite craft tutorials and recipes. Of course, there are other people who use Pinterest to catalog their wishlists of the latest fashions or to collect funny cartoons and memes. Because you can search for and see other pins that people have pinned it's easy to gather inspiration for themed parties or holiday decorations too.
Anyways... I recently found a group of crafty people at our local library who meet twice a month to try out crafts and recipes that they have found on Pinterest! I was so excited! It's been an awesome way to get out of the house every so often and it's a great way to try new things. Last week we tried (you guessed it) the fall garlands pictured above as well as some cinnamon bun popcorn.
The fall garland is simply a number of little pumpkins and apples that have been stung together on jute twine. The pumpkins and apples are made out of toilet paper tubes of all things! I was quite happy with how mine turned out:


For a little added flair I ripped up some green plaid fabric and tied it in between the pumpkins.
It's beginning to look like autumn!
Tuesday, October 2, 2012
The Elder Sign
During my quest to make all of my siblings personalized pillowcases I have found some pretty nice fabric prints. It's been a lot of fun matching colors and patterns to everyone's personality and interests! However, my brother-in-law had me stumped. With such an eclectic taste in obscure music, foreign films and science fiction he was a hard one to shop for.
It wasn't until I stumbled across a hand-stamped fabric project by Frou FruGal that an idea began forming in my head. What if I MADE some customized fabric? I knew that my brother-in-law really liked the legends of Cthulhu by H.P. Lovecraft... so I decided to draw on that for some inspiration.
Apparently, there are a lot of important symbols within the Cthulhu universe, the most notable being the "Elder Sign" which is supposed to protect you from monsters. There is also the "Yellow Sign," which I thought looked pretty cool.


It wasn't until I stumbled across a hand-stamped fabric project by Frou FruGal that an idea began forming in my head. What if I MADE some customized fabric? I knew that my brother-in-law really liked the legends of Cthulhu by H.P. Lovecraft... so I decided to draw on that for some inspiration.
Apparently, there are a lot of important symbols within the Cthulhu universe, the most notable being the "Elder Sign" which is supposed to protect you from monsters. There is also the "Yellow Sign," which I thought looked pretty cool.

Elder Sign and Yellow Sign
I happened to have some stamp-making rubber and some speedball carving tools lying around from when I did some print-making back in school. (Yes, I am one of those weird people who save everything "just in case!" ...and look! It paid off!) I sketched the symbols onto the rubber (which is pretty much the same as a big, flat eraser)... and it wasn't until after I finished the Elder Sign that I realized I should have sketched it backwards. I made sure to do so with the Yellow Sign!

Using my speedball carving tools it was pretty easy to cut around the design and gouge out the negative space.

If you try to make your own stamps at home you will probably find some blogs that say you can just use an x-acto knife, but I highly recommend getting some carving blades. They are curved in "U" and "V" shapes so that they scoop out the rubber and allow you to carve small, intricate details with ease.

Once I had my stamps made I played around on some small squares of black fabric until I found a pattern that I liked.

Stamping with fabric paint onto fabric is much different than stamping with ink onto paper. You have to first create your own stamp "pad" for applying the paint onto the stamp. Much like Frou FruGal created a stamp pad out of felt and fun foam, I created mine out of some scraps of fleece and some disposable plastic lids.

I mixed up some light blue and yellow fabric paint with some translucent fabric paint and spread it onto my "pad" with a plastic knife. It was a challenge to get just the right amount of paint on the stamp... too much and it globbed all over the place and obscured the stamp's details... too little and the imprint was too light to see clearly. I decided to print a yard and a half of fabric because I knew I would make a few mistakes.
It took several long hours to turn this...

...into this!

But it was worth it! The end result was pretty nice. And as an unexpected bonus, the mix of bright and faint symbols gave the design a bit of wizardly shimmer...


...And the pillowcase I made with the fabric turned out pretty cool, too!

UPDATE: You can now purchase Elder Sign fabric on Spoonflower! It's not stamped by hand, but it is custom printed using a design made by these original stamps. Check out the shop here!
Wednesday, September 19, 2012
Buddy's Mini Pizzas
Our little Buddy is one of the happiest and most content little kids you'll meet! But about a year ago he gave us a good scare when we tried to feed him yogurt for the first time. It turns out that he is allergic to milk, among other things.
When we found this out, my husband was especially disappointed that Buddy wouldn't be able to enjoy foods like pizza. Growing up, his family made pizza from scratch on a regular basis and it was a staple in his bachelor diet.
Basically, the only thing in pizza that Buddy can't have is the cheese. However, we discovered that crumbled tofu is not half bad as a dairy-free substitution. Our homemade pizza crust was already dairy-free so pizza has become an easy family meal! Here is how we make it:
Pizza Dough:
1½ cups flour
1 tablespoon (or one packet) yeast
½ teaspoon salt
Mix all of these ingredients together and then add:
2 tablespoons oil
1 cup very warm water
Mix everything together until everything is well blended.
Lastly, slowly add another 1½ cups flour until the mixture becomes a dough and then knead it for a minute or two until it is springy!
I usually use my wonderful stand mixer with a bread hook for the last part... it makes the kneading so much easier!


You can certainly use this dough in a normal sized pizza pan, (and top it with real cheese and whatever toppings you'd like) but for little Buddy we like to make little pizzas and muffin tins work great for this!


Buddy likes his pizzas topped with pepperoni!


When we found this out, my husband was especially disappointed that Buddy wouldn't be able to enjoy foods like pizza. Growing up, his family made pizza from scratch on a regular basis and it was a staple in his bachelor diet.
Basically, the only thing in pizza that Buddy can't have is the cheese. However, we discovered that crumbled tofu is not half bad as a dairy-free substitution. Our homemade pizza crust was already dairy-free so pizza has become an easy family meal! Here is how we make it:
Pizza Dough:
1½ cups flour
1 tablespoon (or one packet) yeast
½ teaspoon salt
Mix all of these ingredients together and then add:
2 tablespoons oil
1 cup very warm water
Mix everything together until everything is well blended.
Lastly, slowly add another 1½ cups flour until the mixture becomes a dough and then knead it for a minute or two until it is springy!
I usually use my wonderful stand mixer with a bread hook for the last part... it makes the kneading so much easier!

Once the dough is kneaded, form it into a ball and put it in a bowl that has been sprayed with cooking spray. Cover it loosely with a clean towel or washcloth and let it sit and rise. I try to let it sit for an hour, but sometimes we only have time to let it sit for 15 minutes or so...

When the dough has "doubled in size," or is trying to escape from your bowl, it has risen enough! Now it's time to punch it down and spread it out on your pan.


Spread on some pizza sauce and then crumble some firm tofu on top.

Buddy likes his pizzas topped with pepperoni!
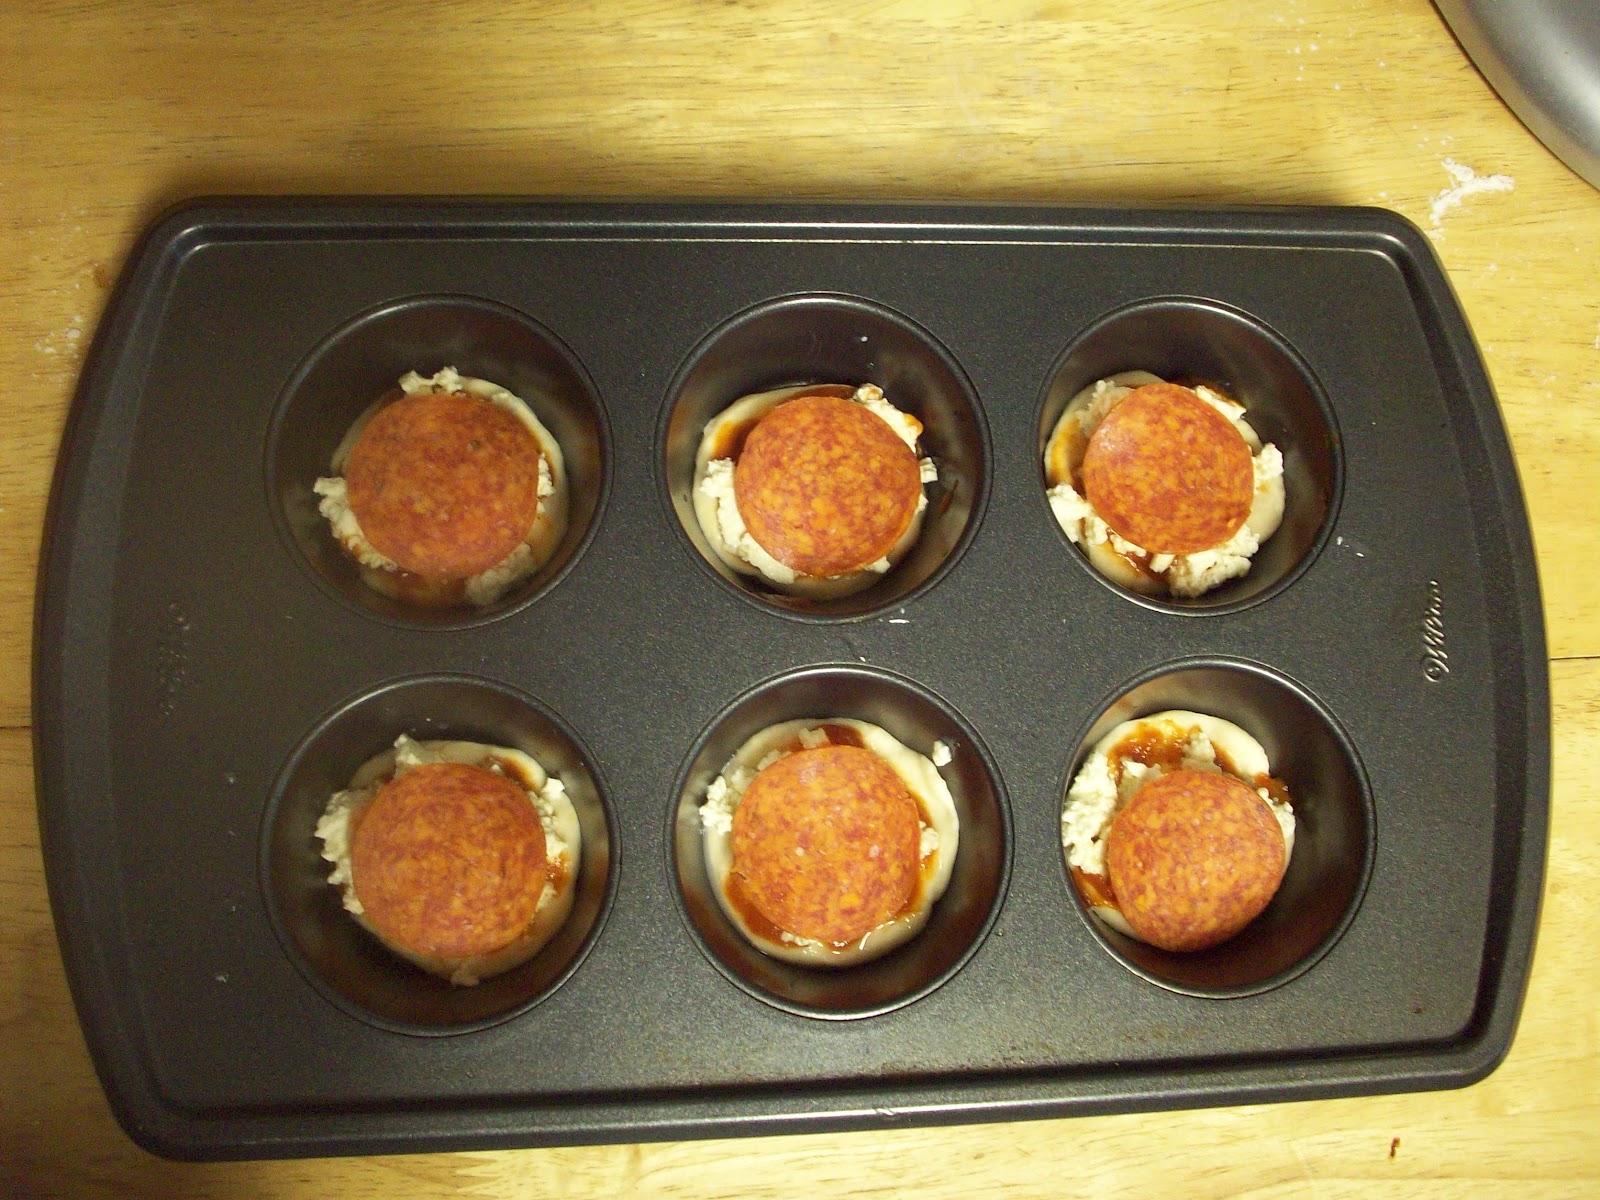
Bake in a 400ºF oven for 15-20 minutes.

...and enjoy!


YUMMY!

Friday, July 13, 2012
A Update on Life
Hi There!
Exciting things are happening for our family as the hubby just landed a new job and we are looking to move to a new town! I'll be taking a break for the next few weeks as we head out and get settled.
In the meantime, here is a smattering of some of my favorite blogs that you may enjoy as well:
How Are You I'm Fine Thanks by Gingerhaze is full of her fun artwork and geeky comics.
MADE offers TONS of great craft ideas and sewing tutorials.
Parenting Illustrated With Crappy Pictures chronicles the hilarious adventure that is being the parent of young children.
Aunt Peaches is an eclectic and somewhat eccentric crafter who loves glitter.
I hope that they can entertain you while we are frantically packing, but rest assured, I will be back!
--Doodle
Exciting things are happening for our family as the hubby just landed a new job and we are looking to move to a new town! I'll be taking a break for the next few weeks as we head out and get settled.
In the meantime, here is a smattering of some of my favorite blogs that you may enjoy as well:
How Are You I'm Fine Thanks by Gingerhaze is full of her fun artwork and geeky comics.
MADE offers TONS of great craft ideas and sewing tutorials.
Parenting Illustrated With Crappy Pictures chronicles the hilarious adventure that is being the parent of young children.
Aunt Peaches is an eclectic and somewhat eccentric crafter who loves glitter.
I hope that they can entertain you while we are frantically packing, but rest assured, I will be back!
--Doodle
Subscribe to:
Posts (Atom)